
TestFlight beta testing best practices: run a beta that actually improves your app
How to recruit TestFlight testers who respond, give them tasks instead of builds, write What to Test notes that get read, and know when to ship.

Beta testing matters more than most developers give realize, because TestFlight users will always find issues you can’t – by doing things you didn’t think of, or just by using devices you don’t own. Along the way they’ll hopefully also validate some assumptions you’ve been carrying around all this time, and maybe even challenge some too. Both outcomes improve your app, but only if you run the beta like you mean it rather than treating it as a chore.
For those who are short on time, here’s one easy win you can try immediately: give your testers tasks to accomplish, not just builds to run. In practical terms, that means saying “please test the whole app” is more likely to produce silence, whereas saying “try adding a new habit and setting a reminder for it, then tell me if anything felt confusing” is more likely to produce feedback you can use.
This is a long guide, so feel free to jump straight to the part you need:
- Recruiting testers who actually respond
- Give testers tasks, not builds
- Write a What to Test that gets read
- Triage feedback without drowning
- When to leave beta
Recruiting testers who actually respond
TestFlight supports up to 100 internal testers, 10,000 external testers, and 90 days of testing per build. The first build of an app added to an external group must pass TestFlight App Review; later builds might not require a full review.
Tip: I usually find that bumping the build number gives me instant approval, whereas bumping the version number (even 0.1 to 0.2) triggers a full review. Trust me: there are few things more frustrating than having to wait for App Review just to sign off on your TestFlight build!
Initially you only need five to test testers for your app. In fact, I’ve written previously how five users is a great number to start testing your app. But that assumes similar users performing similar tasks – it does not cover crashes, device fragmentation, accessibility, or multiple different audience. So, start with a handful so you can fix any obvious blockers, then choose to widen to more users when you’re ready.
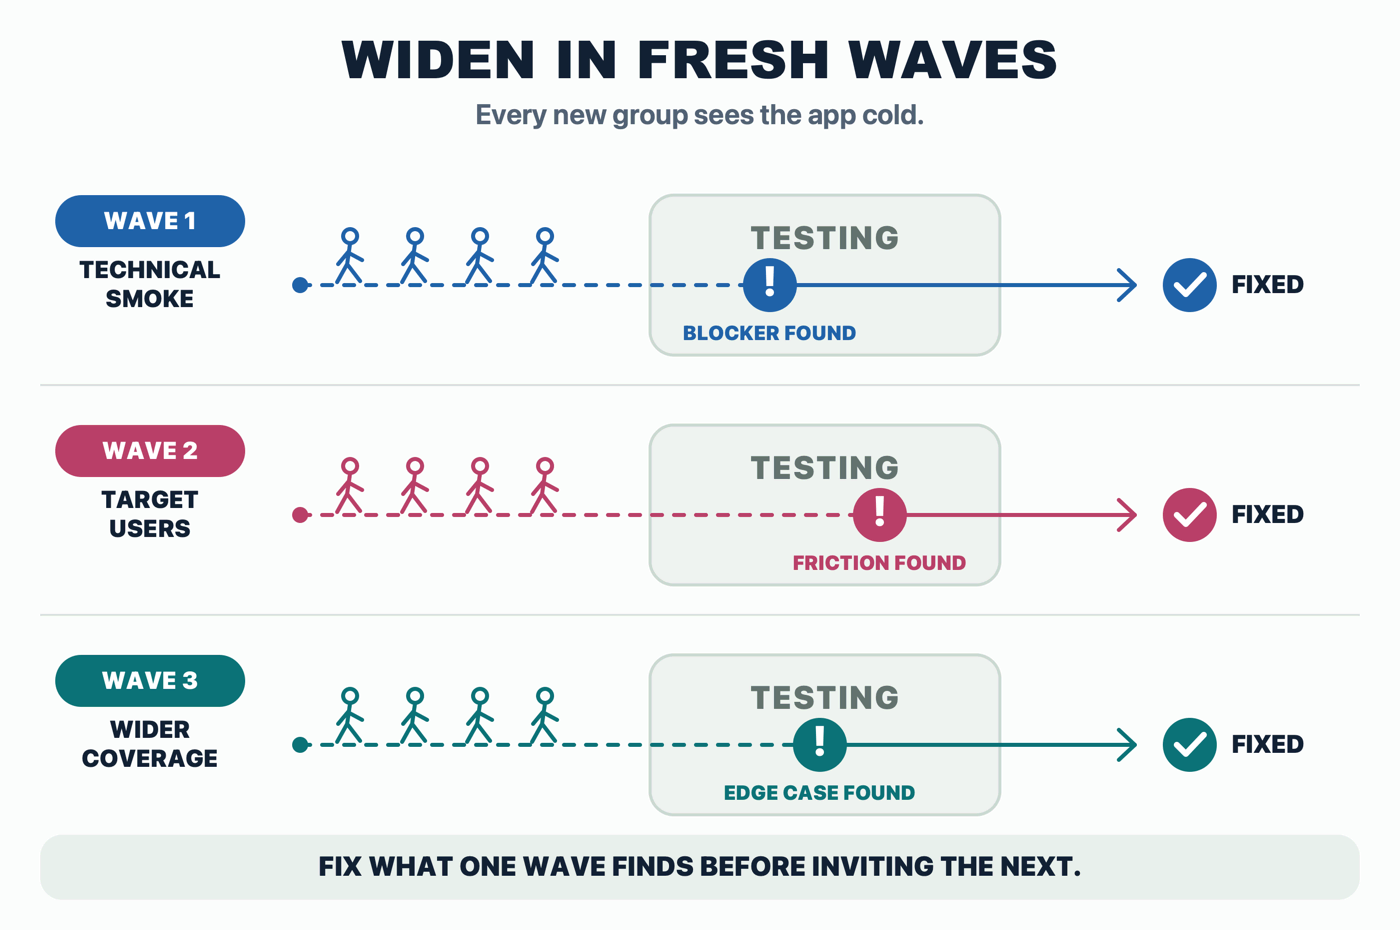
Widening your test is best done in waves, where each wave has a job:
- Start with a couple of people who can report a crash clearly, covering the devices, OS versions, accounts, and permissions most likely to break. Honestly, these are likely to be other developers, because they’ll understand the importance of reproducibility.
- Bring in some representative target users as soon as the core flow is safe enough to test, but early enough that there’s still time to make big changes. You might need separate rounds here if your audiences or accessibility needs differ.
- Expand to more devices, OS versions, locales, and edge cases only after any initial blockers are gone.
Each new wave sees your app cold, which means each wave is a fresh test of your first-run experience – something your existing testers stopped noticing weeks ago.
Where do the target users come from? Ideally wherever your audience already gathers: the subreddit for your niche, the Discord, the forum, or your mailing list if you have one. Ask directly: “I’m building a climbing logbook app and I need ten climbers to break it” works far better than a generic sign-up form. Clearly write the task you’d like them to do, an approximate time commitment, how they should send feedback, and how to exit the test, and where possible prefer to recruit people who have the problem you’re solving rather than sending unsolicited links to strangers.
Give testers tasks, not builds
The goal of beta testing is to improve your app, either by finding and fixing bugs, or by validating and challenging your assumptions. Think of it like the scientific method you learned at school: you already have hypotheses about your app – “people will understand the swipe gesture”, “the free tier is generous enough to hook people” – and TestFlight is how you test them.
That means every build you send should be clear on what you’re looking for. The more specific you can be, the better – “test the whole app” helps nobody. Give them tasks: “Add a new habit.” “Track a new workout.” “Import your last ten photos.” A task takes thirty seconds to write and will transform what comes back.
Then ask questions that target your actual assumptions:
- “What did you expect to happen next?”
- “What happened instead?”
- “Where did you hesitate?”
- “What would you do next?”
Those last two are really important: points of friction are where users easily walk away, which means any beta tester who tells you about them is saving you a one-star review later.
Exactly what you ask for depends on what you’re building. I asked Shainiel Deo of Halfbrick – the studio behind Jetpack Joyride – what they look for when testing games:
“Are players surprised and delighted by an interaction or the characters? Do they quickly restart a level when they fail? These indicators give the development teams a clear sign of whether what they are building resonates with an audience or not.”
I love the restart speed as a signal – if a player fails, makes a happy groan, and jumps straight back in, they are sold.
Your app has an equivalent, whatever it is: the moment someone’s behavior shows the concept clicked. What we really want to know from a beta is how long that “aha!” moment took to arrive – if at all – and that’s hard to see in analytics, which is why you should always give testers an open-ended way to reach you, like a plain email address.
Write a What to Test that gets read
Every TestFlight build has a What to Test field, and it’s easily wasted. I’m as guilty as anyone here – it’s late, the build is uploading, and “Bug fixes and improvements” is right there. But that field is the only message every tester sees when the update notification lands, which makes it the most valuable communication channel your beta has.
Good “What to Test” text does three things:
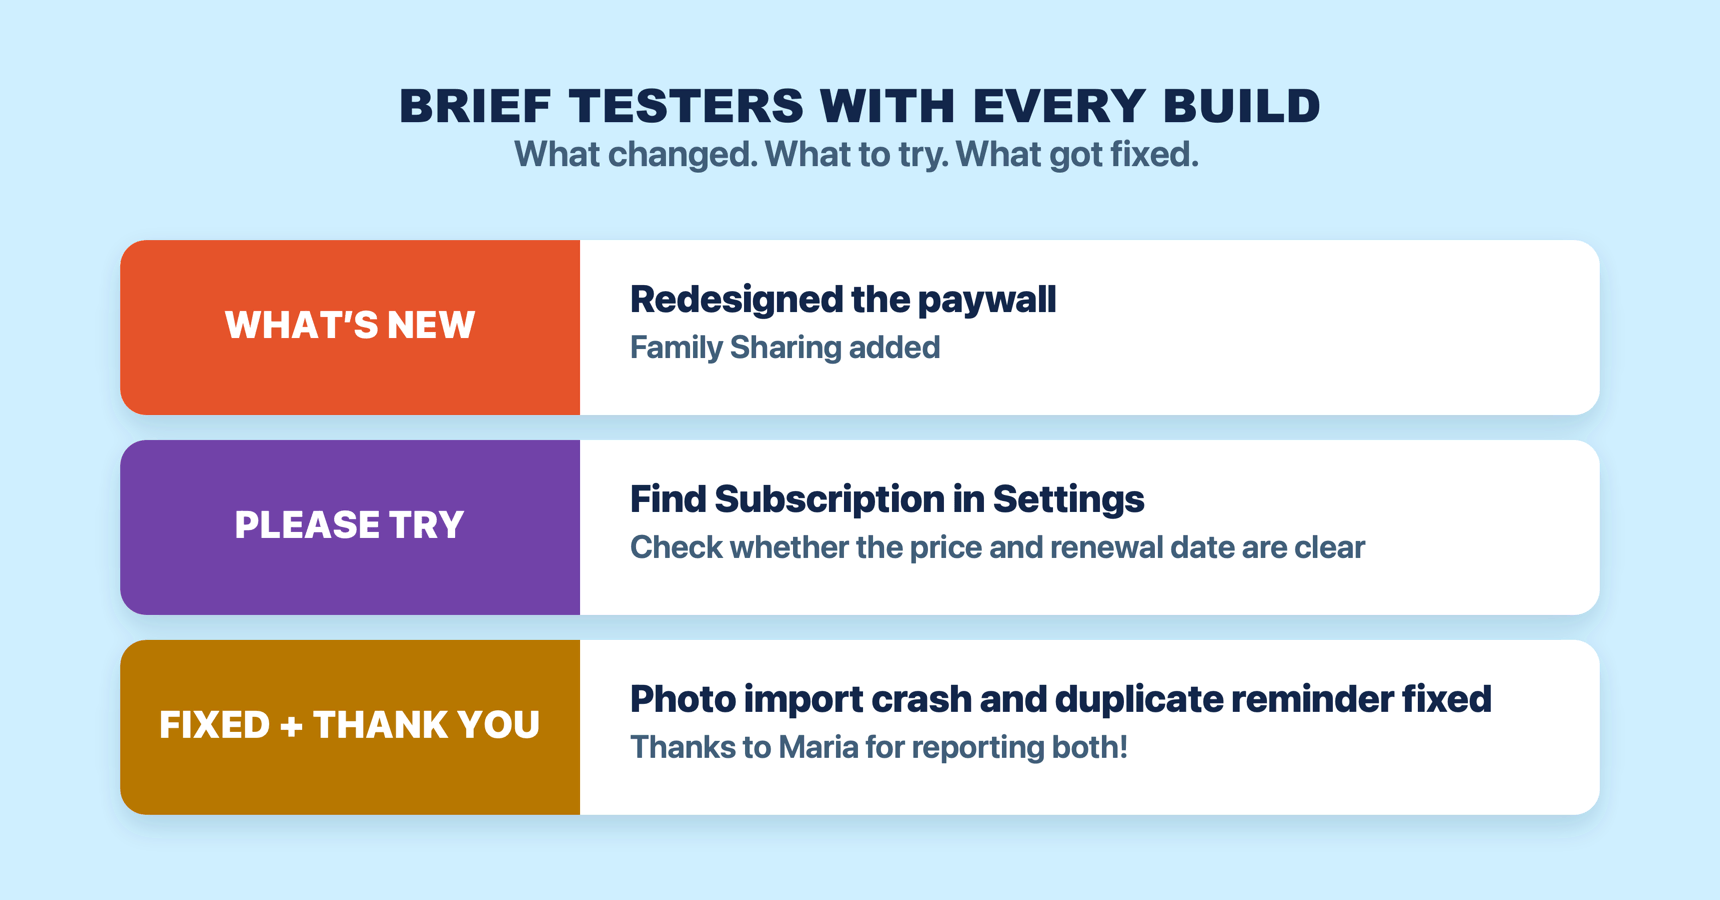
- Says what’s new in this build.
- Gives one or two specific tasks to try.
- Lists the bugs that are now fixed, especially ones that were reported by your testers.
When someone reports a bug and the next build’s notes say “Fixed the crash when solving a challenge – thanks Michael!”, you’ve shown every tester that their reports are listened to, and nothing recruits better than proof that feedback matters.
Here’s a template you’re welcome to steal wholesale:
What’s new: Redesigned the paywall and added family sharing support.
Please try: Open Settings > Subscription and tell me if the new pricing screen makes sense – would you know what you’re paying and when?
Fixed since last build: The crash when importing large photos, and the reminder that fired twice on Mondays. Both were reported by testers – thank you!
That’s just three short paragraphs, all of which will take maybe one minute to write, but it turns a new build notification into a briefing that helps testers dig into what matters.
Triage feedback without drowning
There are two types of TestFlight feedback: screenshot feedback, where a tester marks up a screenshot and adds a comment, and crash feedback, where TestFlight sends you details right after your app dies. Both appear in App Store Connect, and both are also available through the App Store Connect API, so tools like Kickstart can pull them out for you.
However it arrives, the triage rules are the same:
- Take complaints seriously. When testers find problems, suggest features, or even grumble a little, the result might be a better product.
- Watch the metrics as well as the messages. App Store Connect shows you sessions, crashes, and feedback per tester, which tells you who’s actually using the app. A tester with zero sessions after a couple of weeks isn’t helping, so remove them and invite someone new.
And then there’s the hardest part of the whole process: deciding which feedback to act on. Sometimes the right answer is a complete reversal. Klemens Strasser from Art of Fauna told me about a moment like that in his beta:
“My friends Leo and Frederik convinced me to do a 180 on a decision, and it was crucial that they did. They felt strongly that blocks needed to stick together vertically as well as horizontally. I was very hesitant to change it because arbitrary shapes could be formed – U-shapes, T-shapes, O-shapes, etc – and that made the whole drag and drop mechanic more complicated. It’s extremely hard to figure out how blocks should shift around while dragging an arbitrary shape! But they were completely right: while the old one felt good to play, this one feels natural.”
Any developer can almost viscerally feel how hard the drag-and-drop work would be, but he did the work anyway because the feedback was right.
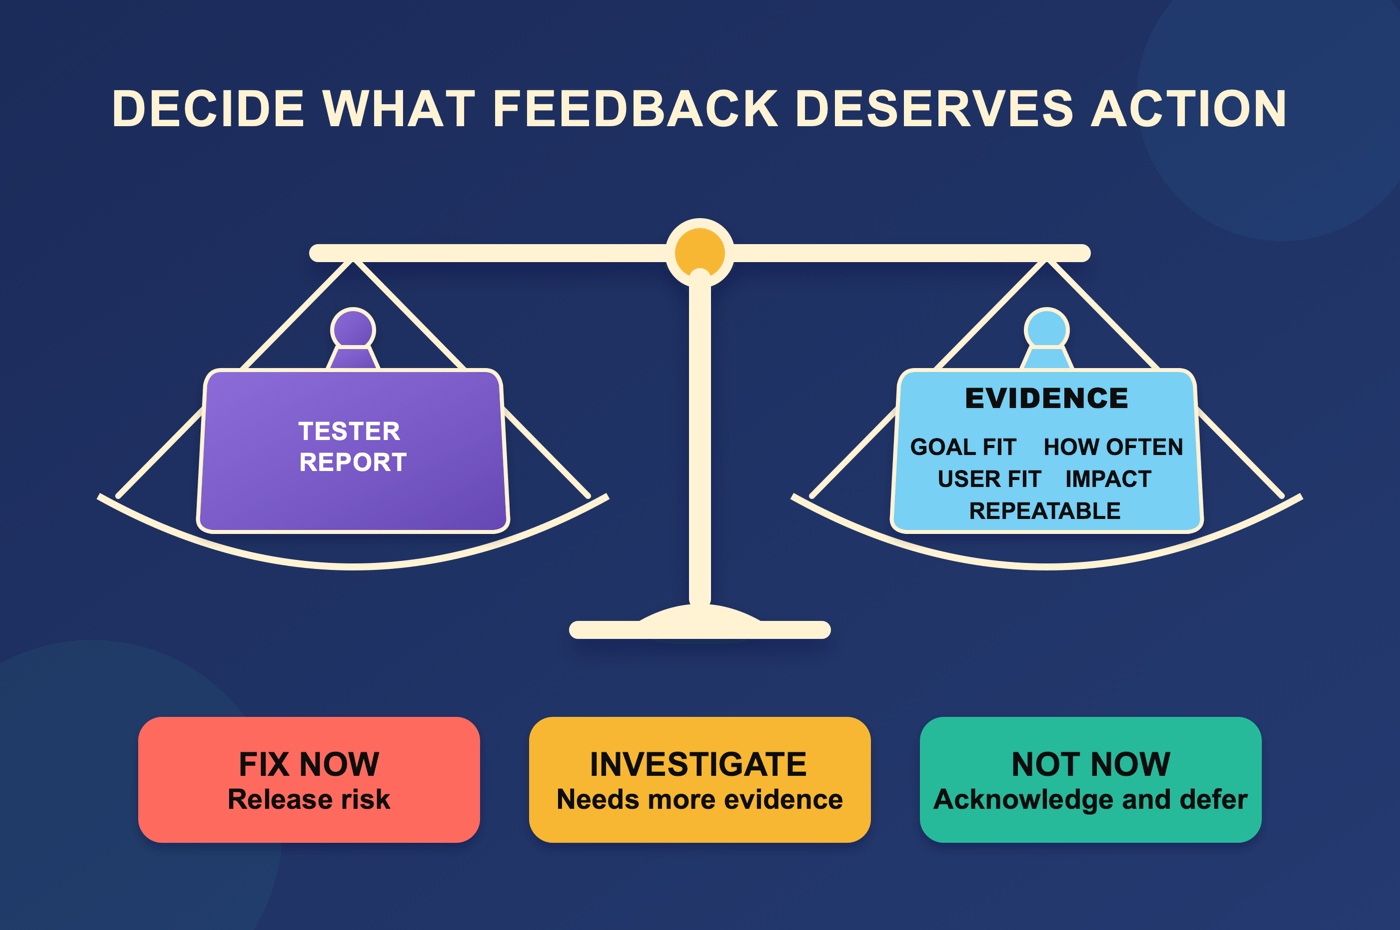
But notice what Klemens didn’t do: he didn’t implement all the suggestions that came in. Instead, you should triage by severity, frequency, reproducibility, affected goal, and fit with your target user. If there’s a tie, use your product judgement.
While we’re here: managing all the test data that comes back isn’t a particularly pleasant experience using App Store Connect. That’s one reason I built TestFlight support into Kickstart – it pulls your builds, tester groups, and feedback into one Mac app and work with it all there. But the App Store Connect website does the job too; the habit is what matters, not the tool.
When to leave beta
TestFlight lets you share up to 100 builds, with each uploaded build having its own 90-day testing window. Uploading a new build won’t remove the old one – they can carry on running for weeks or even months as long as each new build has a purpose and keeps teaching you something new.
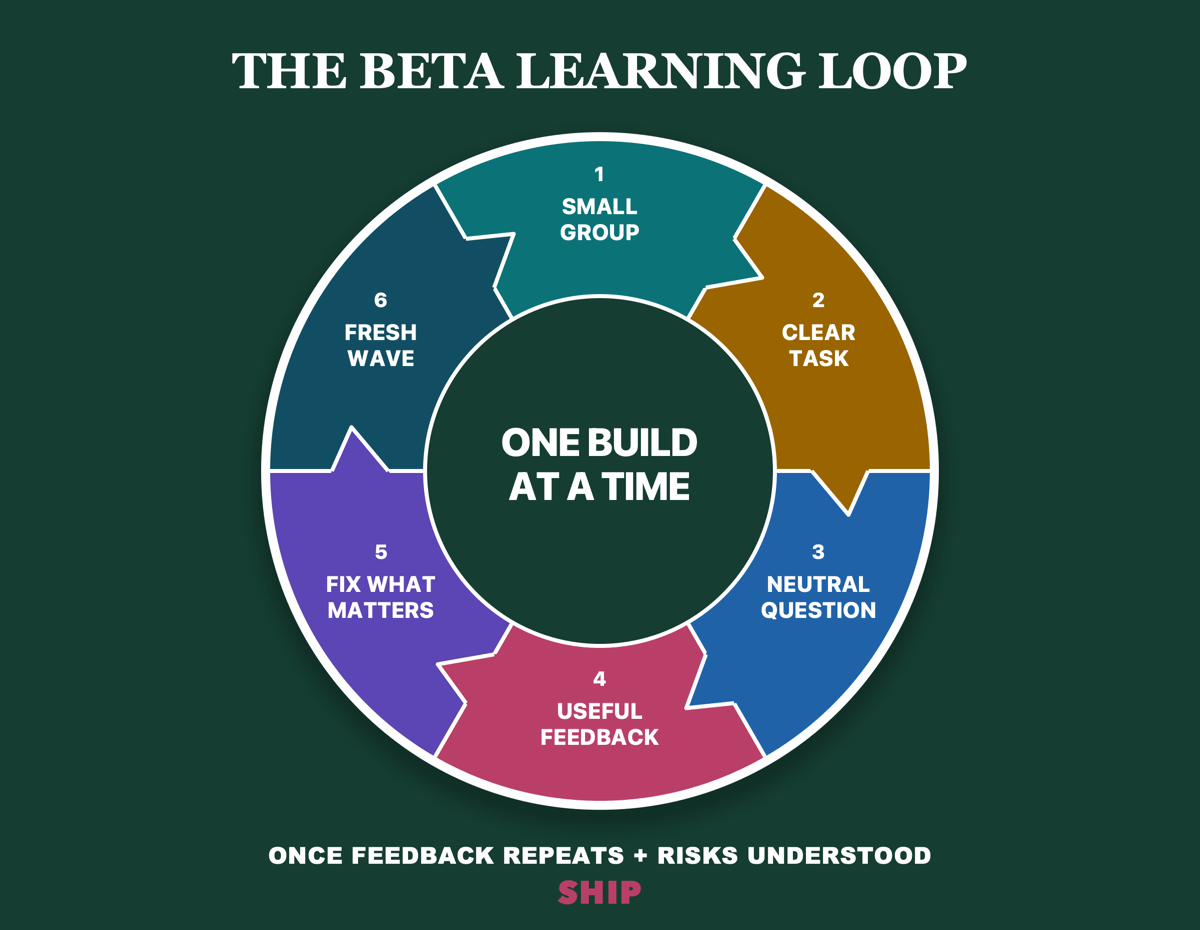
So the question isn’t “how long?” but “what am I still learning?” Ship to the App Store when:
- Feedback starts repeating. When three consecutive builds produce the same feature requests and no new bugs, it’s done.
- Release-blocking risks are understood. Crashes matter, but data loss, security or privacy problems, corrupted purchases, and blocked core workflows are more serious. Set explicit exit criteria for severity and coverage.
- Your assumptions have verdicts. Look back at the hypotheses you wrote down earlier – each one should be validated, disproven, or consciously deferred.
What you should not wait for is the feedback to stop entirely, or the app to “feel finished.” It never will, and the diminishing returns are real – a beta that drags on past its useful life just delays the feedback that matters most, which comes from paying customers.
Every issue you find and fix in beta is significantly cheaper and less damaging than any fix you put out after the app goes public.
That’s the whole economics of TestFlight: a crash found by a tester costs you one build; the same crash found by a customer costs you a one-star review that outlives the fix by years. Run the beta like you mean it, and then – when it stops teaching you things – have the nerve to ship.
Stop reading, start doing
- Give testers tasks, not builds – “the whole app” helps nobody.
- Find five engaged testers who can make a strong first usability round; cover technical risks and distinct user segments separately.
- Give every build gets a real What to Test: what’s new, what to try, what’s fixed – with reporters thanked by name.
- Ask questions that test assumptions: “was X easy to find?”, “what was missing?”
- End your beta test when feedback repeats and crashes stop, rather than when the app feels “finished.”